Holy crap, it's been over 8 years since I started this project! I think It's time to resurrect it.
It's funny how much time a project can consume. I now have a pair of red-oak boxes to house both the phono pre-amp and its power supply. Both have aluminum top panels and perforated-steel bottom panels that mount to the boxes using tapped angle aluminum. The power supply attaches to the pre-amp chassis using a six-foot umbilical made up of a set of shielded twisted-pair cables ending with a military-quality 19-pin Bendix twist connector. A power switch enables the supply, which then waits for a signal from the pre-amp to energize the pre-amp circuits. The power supply is finally together so I can move on to the pre-amp.
I built the pre-amp's first two stages on a slab of Delrin, not stopping to think that it will sink my tubes into the chassis. This is significant for the 2nd-stage tubes, which are 6AM4s (pretty short single triodes.) A switch on the pre-amp front panel tells the remote power supply to energize the amp circuits. I used gas regulators in the pre-amp (if I didn't provide schematics earlier, I'll plan to in the future,) which require more than the regulated voltage to start. This would mean that I have 45V more across my current regulators than I planned, making them dissipate a lot! To cover this, I installed a current monitor in the power-supply chassis to detect when the gas regulators fire off: when the current steps up, a voltage-dropping resistor is placed in series with the B+ supply that drops the voltage down to the levels I planned.
Anyway, I'll post more status when it gets juicy, and hopefully sooner than 8 years!

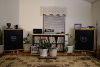
I attached a few pictures of the power supply and pre-amp. With all the things I screwed in underneath, the top looks like a crazy riveter got loose!